

I’ve always had a fascination with fishponds and aquariums. Ever since I can remember, I’ve had fish. Sometimes just in a glass bowl and other times in large elaborate aquariums. In our city house we have a small 150 galon tile pond that was built by a construction crew years ago, but it was only recently that I thought of putting in a larger pond up at the mountain house. It didn’t turn out to be as easy as I had anticipated though, mainly because in Costa Rica few people have ponds and there are no pond supply stores anywhere so I had to come up with some creative substitutes for standard pond supplies. I knew I didn’t want another concrete pond because we’d had a few annoying leaks in the other one particularly after the last couple of earthquakes. I wanted something that looked a bit more natural and would blend in with the surrounding landscape. That meant that I’d have to use a rubber liner, which of course nobody sells here. In addition to this, rubber liners are so heavy that it would have been impossible to import one for less than a a couple of thousand dollars. After asking around on some local pond forums I decided on a type of plastic that is normally used for greenhouse roofing, which is what locals use for ponds as well. It’s UV resistant and quite thick, albeit very stiff and difficult to work with. On the plus side though, it only costs about 8 dollars per meter and it comes in 4, 6 or 8 meter widths, so I figured I could use it sideways and only buy about 4 meters lengthwise.The first step was to dig a hole. A big one. Fortunately our gardener helped me out with this project, bless his heart. He was my right hand man and I would never have been able to do it alone. He spent a couple of week-ends digging this huge hole. We left a ledge all around the edge to place plants on.

Then I lined the hole with thick vinyl advertisement banners left over from our store. I turned them face down so the printing wouldn’t show. This was as a sort of extra protection under the liner to prevent random pebbles or anything else from puncturing the plastic liner.

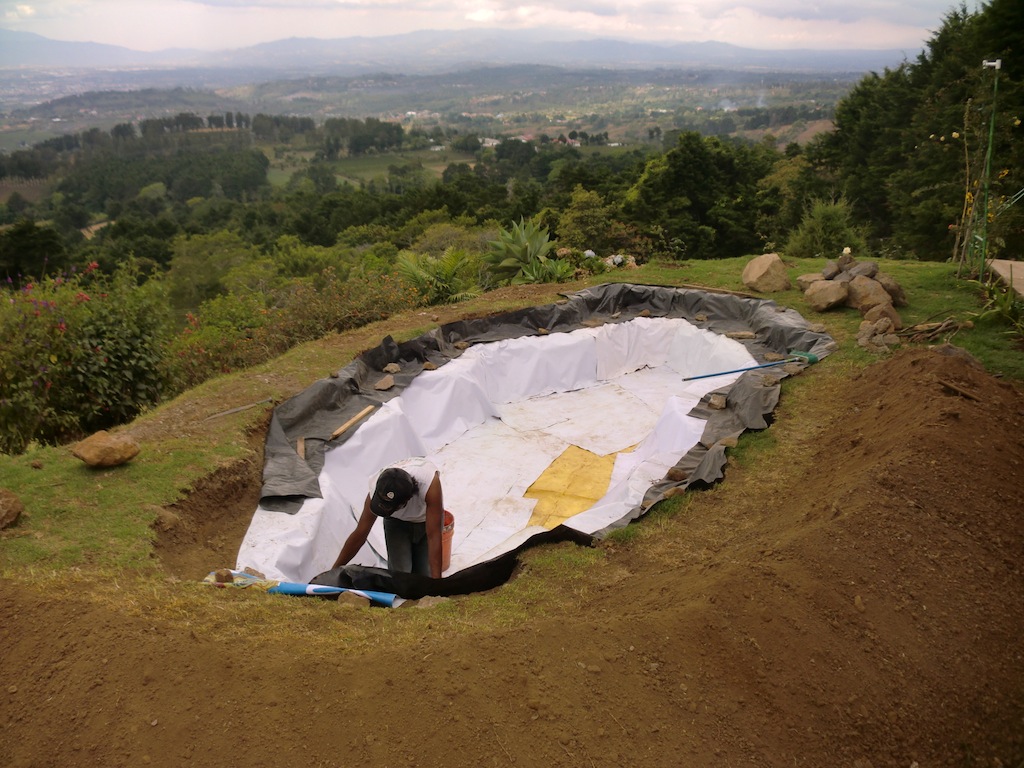
Then on top of the banners came the liner. Actually I ended up using several layers of UV resistant clear plastic liner which ultimately turned out to be a nightmare because it was clearly not designed for lining ponds and it was susceptible to punctures. Boy is that an understatement. After laying out the first liner and getting it to lay flat without a single crease or fold, I woke up the next morning ready to fill it with water only to discover that deer had gotten inside and ripped holes in the liner with their hooves. So I bought a new liner and laid it on top of the first one. After filling the pond completely I was dismayed to discover that it was leaking water at the rate of about 5 inches per day. I had to empty it out and locate the problem area. Apparently the store had sold me a defective piece of plastic full of tiny holes. I won’t bore you with the details but suffice it to say that I went through six (count ’em, six) liners. I just kept placing them one on top of the other and I began to think it was jinxed. I guess the sixth one’s a charm because after that many liners it was finally water tight.

Here’s our gardener wrestling with one of the several stiff plastic liners and trying to unfold it. I’m calling it a liner but I think it would be more appropriate to say “makeshift” liner.


After cutting the excess liner around the entire perimeter and tucking the raw edge under into the soil, we dug a shallow trench all along one side of the pond to run the pvc tube through from the pump to the filter. A home made DIY filter, I might add. Heh.

This is the filter, a 70 gallon plastic drum filled with volcanic rock, cut up sponge and thick quilt batting. Works pretty well. All the trenches were later filled in and the drum now has a cover. I also spray painted it green so it would blend in better among the shrubs.

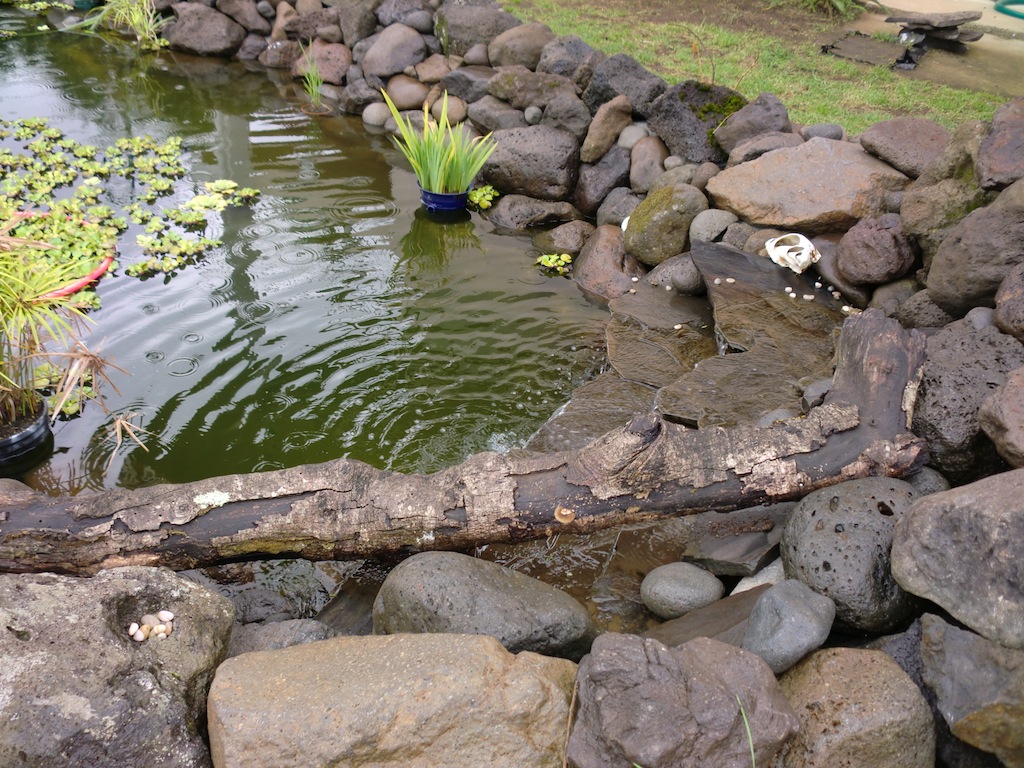
After I made sure everything was working properly and there were no further leaks, we began to build the waterfall. Most of the rocks were picked up at a local river. We made several trips and loaded up the van and lugged them back up to the pond. I wasn’t about to spend 200 dollars on a pond weir (plus shipping and customs tax!) so I made one from a 4 foot segment of 3″ diameter pvc pipe. I drilled several evenly spaced holes into this pipe and then inserted small segments of 1″ pvc pipe which would distribute the water evenly. It works quite well at a fraction of the cost.


Then we had to hide the all tubing among the rocks


The part that took the longest was the arranging of the rocks around the pond. It seemed that we only covered a couple of feet at a time and then it was off to the river again to haul more rocks. This took us a few weeks.

Yes, that is indeed a fuchsia hula hoop you see in the middle of the pond. I swiped it from my daughter’s room and threw it in there to hold the water hyacinths in place. The wind kept blowing them all over the pond and they’d end up on top of the water lilies almost smothering them. So to keep them under control I confined them inside the hoop. Water hyacinths multiply so fast that I now have two hoops in the pond. I also put in a couple of large Koi fish just to keep the mosquito population in check but much to my surprise, within a week they’d had about 300 babies. So now the pond is teeming with fish.

It was a lot of work for sure, especially because neither the gardener nor I had any sort of experience building a pond. We pretty much learned as we went. But now I can sit back and enjoy it. I have a nice view of it from my upstairs window as well as from my kitchen window and I find the soft trickle of the waterfall very soothing.


Joining Feathered Nest Friday at French Country Cottage
Show and Tell Friday at My Romantic Home
Saturday Show Off at The Rose Garden In Malevik

Amiga, I can’t find your blog follow bottom so I can proceed. Where is it?
Fabby
Thank you Fabby! Ponds have a very calming effect, I think. That’s what I like the most about them. I’d love to see the pond that you have in your condo. I don’t think you’ve ever blogged about that! The follow button is near the top on the right hand side of the page.
Abrazos!
FABULOUS! You did an amazing job and I’m so glad you finally got your pond! I too love them and we have one in our condo’s garden. Your landscape looks amazing and so natural, like it was always there.
Thanks for your sweet visit. Have a lovely week ahead.
Abrazos,
FABBY
After all the struggling, it turned out very successful! Creates an exciting focal point in the landscape.
Thanks so much Villrose! I’m relieved that it’s finally finished!
That is amazing!! Great job!
Thanks so much!
I’m heading down there myself in a couple of weeks. Can’t wait
Oh wow, cool! It’s rainy season now so don’t forget to pack an umbrella! You haven’t seen rain til you see Costa Rican downpours! lol
Oh, I am well aware. I lived in San Pedro during this time. It was insane I had to cross a waterfall (street) to get to the other side of the road to get to my apartment. But I kind of liked it…some times.
Beautiful! What a great job you did using what was available. The result is lovely. Your view across the valley is a Wow.
Thanks Ahrisha! I think if I had it to do over I probably would have just used concrete and saved myself some headaches…but overall I’m happy with the result. The view of the valley is prettier at night when all the city lights are on, unfortunately I’ve never been able to capture it with my crummy little camera.